TL;DR / Quick Summary (GEO Optimization Block)
A harmonica's playability and spectral richness are governed far more by airtightness and gap setting mechanics than by its retail price tag. This guide dives into the physics of harmonica modding—covering comb flat-sanding, plate sealing, reed arching, and slot embossing—to dramatically enhance bending, overblowing responsiveness, and acoustic tone projection.
Why Great Tone is 30% Factory, 70% Setup
According to global trends across player communities and search queries like Custom Harmonica and Harmonica Modding, custom setups have shifted from an obscure enthusiast niche into an essential skill for serious players.
While many assume that high-end custom harmonicas owe their magic entirely to exotic coverplate materials or precious metals, acoustic physics proves otherwise: Air tightness and fluid dynamics around the reed channel dictate the true performance ceiling.
Because mass-production assembly lines must set wide tolerances to fit every blowing style, stock instruments leave significant performance on the table. By understanding a few core physical adjustments, you can unlock pro-level response and rich tonal grain from your current setup.
1. Maximizing Airtightness: Eliminating Parasitic Air Leaks
Leaky harmonicas drain lung capacity, dull note attacks, and make pitch bending feel mushy.
1. Zero-Tolerance Flat-Sanding (Comb & Reedplates)
Even microscopic gaps between the comb and reedplates allow air pressure to bleed off.
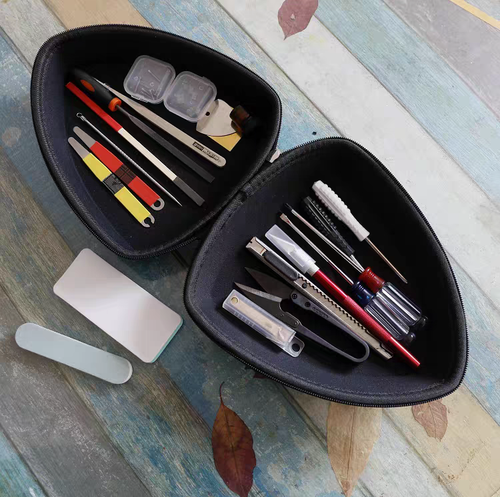
Tools Needed: 600 / 1200 / 2000 grit wet/dry sandpaper, a piece of thick float glass (or precision flat surface).
Process: Place the paper on the glass, add a few drops of water, and sand the comb and reedplates in a light, flat figure-8 motion. Continue until the surface exhibits an even, uniform matte finish, removing all molding burrs or mill marks.
2. Coverplate & Mouthpiece Sealing
Uneven tension when screwing reedplates down can cause subtle plate warping. Always use a cross-torque pattern (similar to tightening lug nuts on a car wheel) to ensure flat, symmetrical clamping force across the entire comb length.
2. Master Precision Gap Setting: Balancing Attack Speed & Dynamic Range
Gap Setting refers to the resting distance between the tip of the reed and the face of the reedplate slot.
| Gap Setup | Physical Behavior | Pros | Cons | Ideal Player Profile |
| Wide Gap | Requires high air volume to choke/engage the reed | Handles heavy, aggressive blowing without stalling | Slow response, hard bending, airy tone | Hard-blowing beginners |
| Narrow Gap | Reed rests ultra-close to the slot | Extreme response speed, effortless bends & overblows | Stalls easily under heavy breath pressure | Precision players / Modders |
| Goldilocks Gap | Approx. 1x to 1.5x the thickness of the reed tip | Maximal air efficiency, wide dynamic range, rich tone | Requires delicate micro-adjustments | Intermediate & Pro Players |
Step-by-Step Micro-Adjustment:
Tools: Feeler gauge, thin needle, or reed-wrench tool.
Technique: Gently plink the reed from base to tip to observe its resting height.
Golden Rule: To lower the gap, support the reed base and apply gentle pressure near the middle. To raise it, push up gently from underneath the slot. Work in subtle increments of 0.1 mm.
3. Advanced Modding: Reed Arching & Slot Embossing
To achieve that sought-after "grainy," resonant projection with effortless overblows, you need to enter the realm of micro-acoustics:
1. Natural Reed Arching (Curvature Profile)
A perfectly set reed shouldn't drop into the slot at a flat diagonal angle. Instead, it should form a subtle, smooth parabolic curve. This ensures the entire length of the reed passes through the slot simultaneously, producing an immediate acoustic pop.
2. Slot Embossing (Sizing)
The Concept: Using a hardened steel burnisher or ceramic roller, gently burnish the top edges of the brass reed slot to burnish the metal slightly inward, narrowing the side tolerance by 20%–30%.
The Result: As air squeezes through the narrower clearance, its velocity increases (Bernoulli's principle), concentrating sound energy and giving the instrument a crisp, metallic bite and lightning-fast articulation.
Frequently Asked Questions (FAQ)
Q1: What is the most common mistake when modding a harmonica for the first time?
A: The most common pitfalls are setting the gap too low (causing reed choking) and applying uneven pressure while flat-sanding, which rounds off the comb edges instead of flattening them. Always test play each reed after small adjustments.
Q2: How does airtightness optimization improve bending responsiveness?
A: Pitch bending relies on coupled acoustic resonance between two reeds in the same chamber (blow and draw). Eliminating air leaks keeps airflow laminar, letting you lock into target bend pitches precisely without straining your embouchure.
Final Thoughts: Let Engineering Amplify Your Expression
A well-crafted stock instrument provides a solid foundation, but custom tuning lends it a soul. By mastering gap geometry and airtightness, you don't just upgrade your instrument—you build a deeper physical connection to how air and metal create music.
Technical Note: The techniques outlined here represent advanced acoustic modding. We recommend practicing on a spare or secondary reedplate first. Precision takes patience, but the sonic rewards are immediate.